When it comes to creating professional and visually appealing documents, knowing how to format margins in Google Docs is essential. Margins play a crucial role in document design, ensuring that your text is well-organized and easy to read. Whether you're drafting a school report, a business proposal, or a personal letter, adjusting margins can make a significant difference in the overall appearance of your work. With Google Docs, you have the flexibility to customize margins to suit your specific needs, and this guide will walk you through every step of the process.
Google Docs is a powerful tool that simplifies document creation, but many users overlook the importance of margins. Properly formatted margins not only improve readability but also ensure that your document adheres to specific guidelines, such as those required for academic or professional submissions. By mastering the art of formatting margins, you can elevate your document's presentation and ensure it meets the highest standards.
In this comprehensive guide, we'll explore everything you need to know about formatting margins in Google Docs. From step-by-step instructions to advanced tips, we'll cover all the bases to help you become proficient in adjusting margins. Whether you're a beginner or an experienced user, this article will provide valuable insights to enhance your document formatting skills.
Read also:Exploring The Future Of O Yeong Su 2025 A Comprehensive Guide
Table of Contents
- What Are Margins and Why Do They Matter?
- How to Format Margins in Google Docs?
- Can You Use Predefined Margins in Google Docs?
- How to Adjust Margins for Specific Sections?
- Why Should You Avoid Extreme Margin Settings?
- Format Margins in Google Docs for Printing
- What Are the Common Mistakes to Avoid?
- How to Save Your Preferred Margin Settings?
- Tips for Professional Margin Formatting
- Conclusion
What Are Margins and Why Do They Matter?
Margins are the blank spaces around the edges of a document. They serve multiple purposes, such as providing space for binding, improving readability, and ensuring that the text doesn't appear cramped. Proper margins are especially important when printing documents, as they prevent text from being cut off or appearing too close to the edges.
In Google Docs, margins are adjustable, allowing you to customize them based on your preferences or specific requirements. For instance, academic papers often require one-inch margins, while business documents may need narrower margins to fit more content on a page. Understanding how to adjust these settings is key to creating polished and professional documents.
How to Format Margins in Google Docs?
Formatting margins in Google Docs is a straightforward process. Here’s how you can do it:
- Open your document in Google Docs.
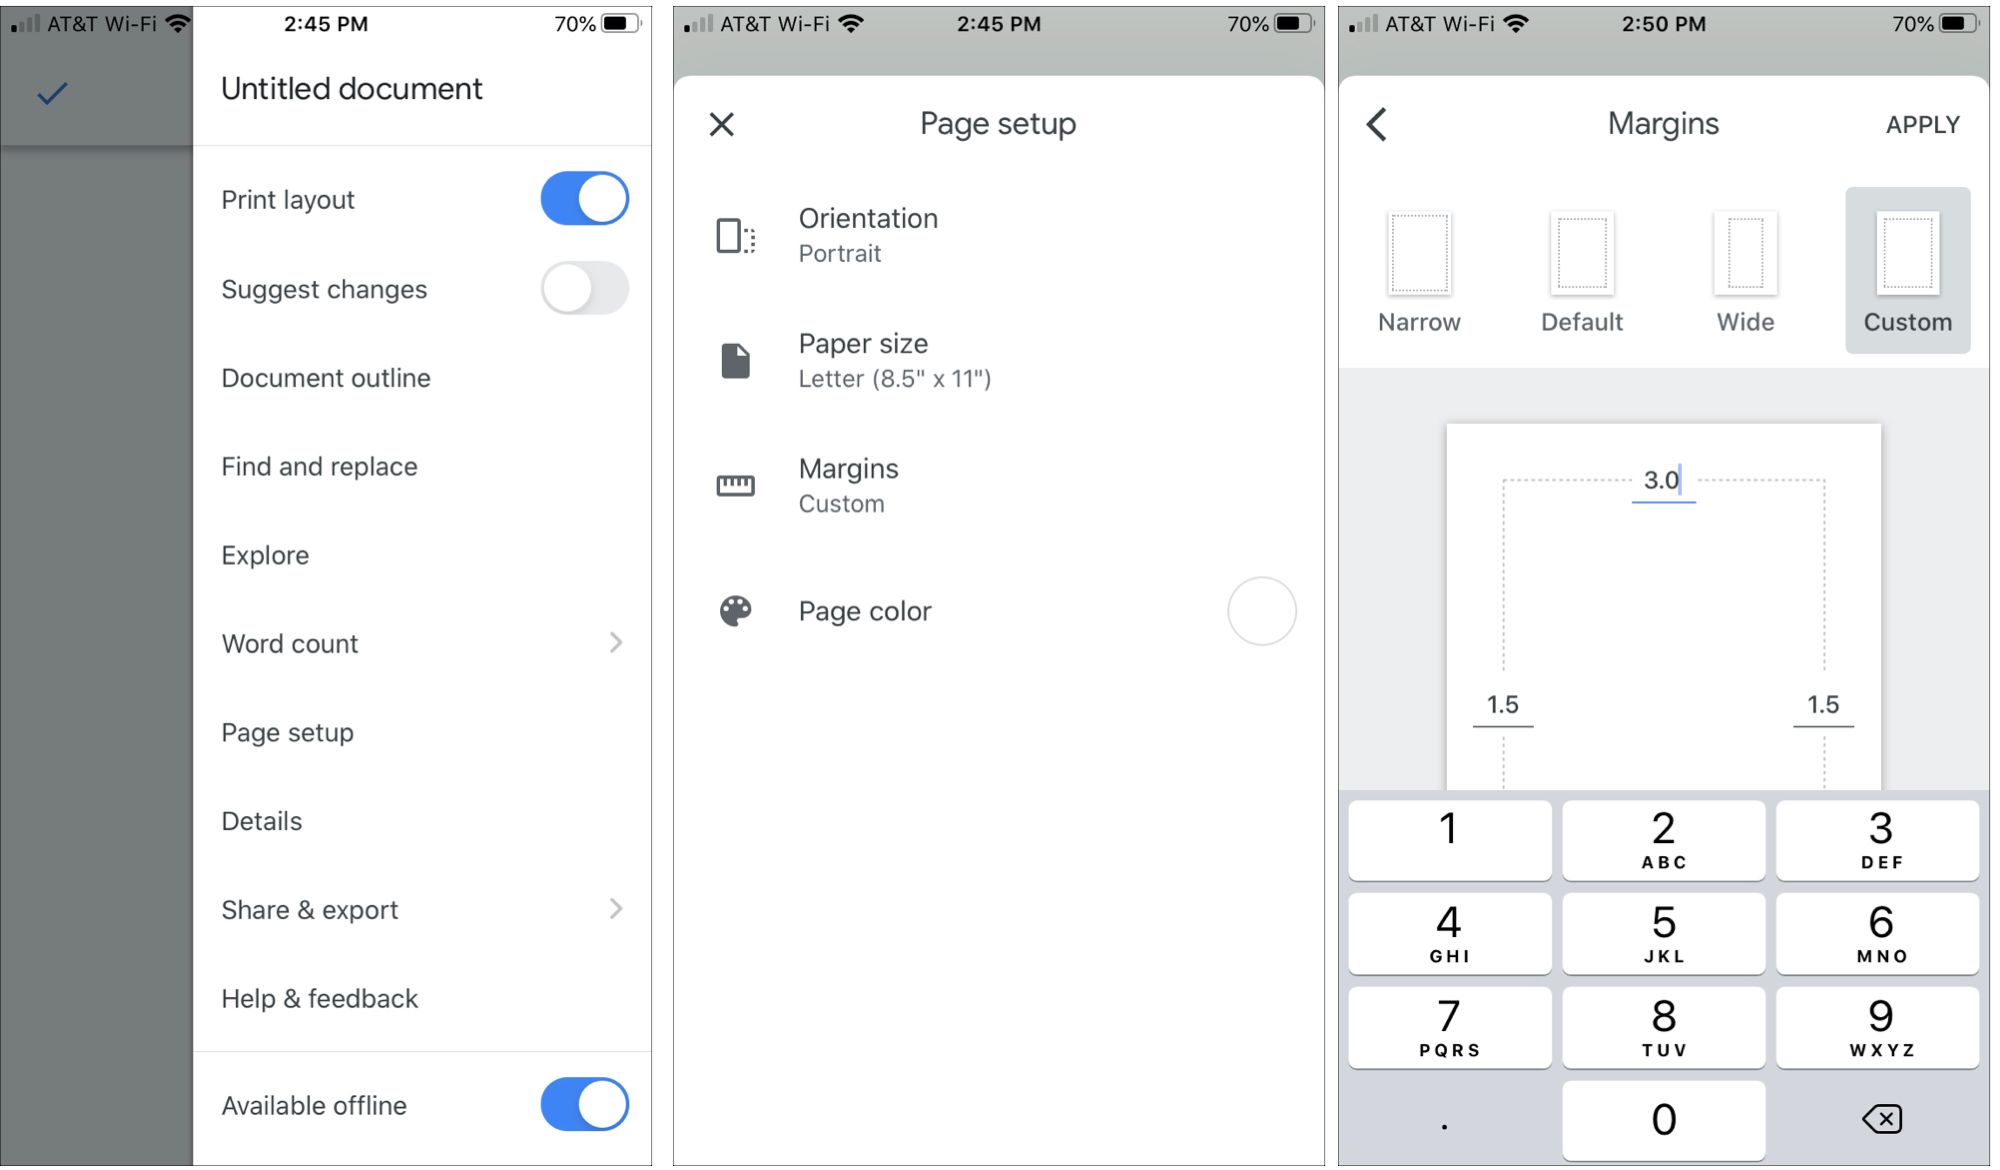
- Click on File in the top menu, then select Page setup.
- In the dialog box that appears, you can adjust the top, bottom, left, and right margins by entering specific values.
- Click OK to apply the changes.
Alternatively, you can drag the margin markers on the ruler at the top and sides of the document for quick adjustments. This method is particularly useful if you prefer a visual approach to formatting margins in Google Docs.
Can You Use Predefined Margins in Google Docs?
Google Docs doesn’t offer predefined margin templates, but you can save your custom margin settings as a default for future documents. This feature is especially helpful if you frequently use the same margin sizes. To set a default, follow these steps:
- Go to File > Page setup.
- Adjust the margins as desired.
- Click Set as default at the bottom of the dialog box.
Now, every new document you create will automatically use these margin settings, saving you time and effort.
Read also:William Baldwin The Underrated Hollywood Star You Need To Know
How to Adjust Margins for Specific Sections?
If you need different margins for specific sections of your document, you can use section breaks. Section breaks allow you to customize margins for individual parts of your document without affecting the entire file. Here’s how:
- Place your cursor where you want to insert the section break.
- Go to Insert > Break > Section break (next page).
- Adjust the margins for that section by using the ruler or the Page setup menu.
This technique is particularly useful for documents like resumes or reports that require varying margin sizes for different sections.
Why Should You Avoid Extreme Margin Settings?
While Google Docs allows you to set margins as narrow or wide as you want, it’s important to avoid extreme settings. Narrow margins can make your document look cluttered and difficult to read, while excessively wide margins can waste space and make your content appear sparse. Striking the right balance is crucial for creating a visually appealing and professional document.
For most documents, a standard margin size of 1 inch (or 2.54 cm) works well. However, if you’re working on a specific project with unique requirements, you may need to experiment with different settings to find the perfect balance.
Format Margins in Google Docs for Printing
When preparing a document for printing, it’s essential to consider how the margins will look on paper. Printers often require a minimum margin to ensure that the text doesn’t get cut off during printing. To avoid this issue, always check your printer’s specifications and adjust the margins accordingly.
Additionally, you can use the Print preview feature in Google Docs to see how your document will look when printed. This allows you to make any necessary adjustments before sending the file to the printer.
What Are the Common Mistakes to Avoid?
Many users make mistakes when formatting margins in Google Docs. Some of the most common errors include:
- Using inconsistent margins throughout the document.
- Ignoring printer requirements, leading to cut-off text.
- Setting margins too narrow, which compromises readability.
By being mindful of these pitfalls, you can ensure that your document looks polished and professional.
How to Save Your Preferred Margin Settings?
As mentioned earlier, you can save your preferred margin settings as a default in Google Docs. However, if you work on multiple types of documents with different margin requirements, you might want to create templates for each type. For example, you can create a template for academic papers with one-inch margins and another for business reports with narrower margins.
To create a template:
- Format the margins as desired.
- Go to File > Save as template.
- Give your template a name and save it for future use.
Tips for Professional Margin Formatting
Here are some additional tips to help you format margins in Google Docs like a pro:
- Always double-check your margin settings before finalizing a document.
- Use the ruler for quick adjustments, but rely on the Page setup menu for precise control.
- Experiment with different margin sizes to see what works best for your content.
- Consider the purpose of your document when choosing margin sizes.
Conclusion
Formatting margins in Google Docs is a simple yet powerful way to enhance the appearance and readability of your documents. By understanding the importance of margins and mastering the techniques to adjust them, you can create professional-looking documents that meet your specific needs. Whether you’re working on a school assignment, a business proposal, or a personal project, proper margin formatting can make a significant difference.
With the tips and instructions provided in this guide, you’re now equipped to format margins in Google Docs with confidence. Remember to experiment, save your preferred settings, and always consider the purpose of your document when making adjustments. Happy formatting!